Build autoscaling
Container build autoscaling allows you to automatically scale out your builds to multiple BuildKit builders based on the number of concurrent builds you want to process on a single builder. This feature is available on all Depot plans and can significantly speed up your container builds when you have multiple concurrent builds or resource-intensive builds.
How build autoscaling works
By default, all builds for a project are routed to a single BuildKit host per architecture you're building. Each BuildKit builder can process multiple jobs concurrently on the same host, which enables deduplication of work across builds that share similar steps and layers. Autoscaling is disabled by default, so there's no cap on concurrent builds per builder until you enable it.
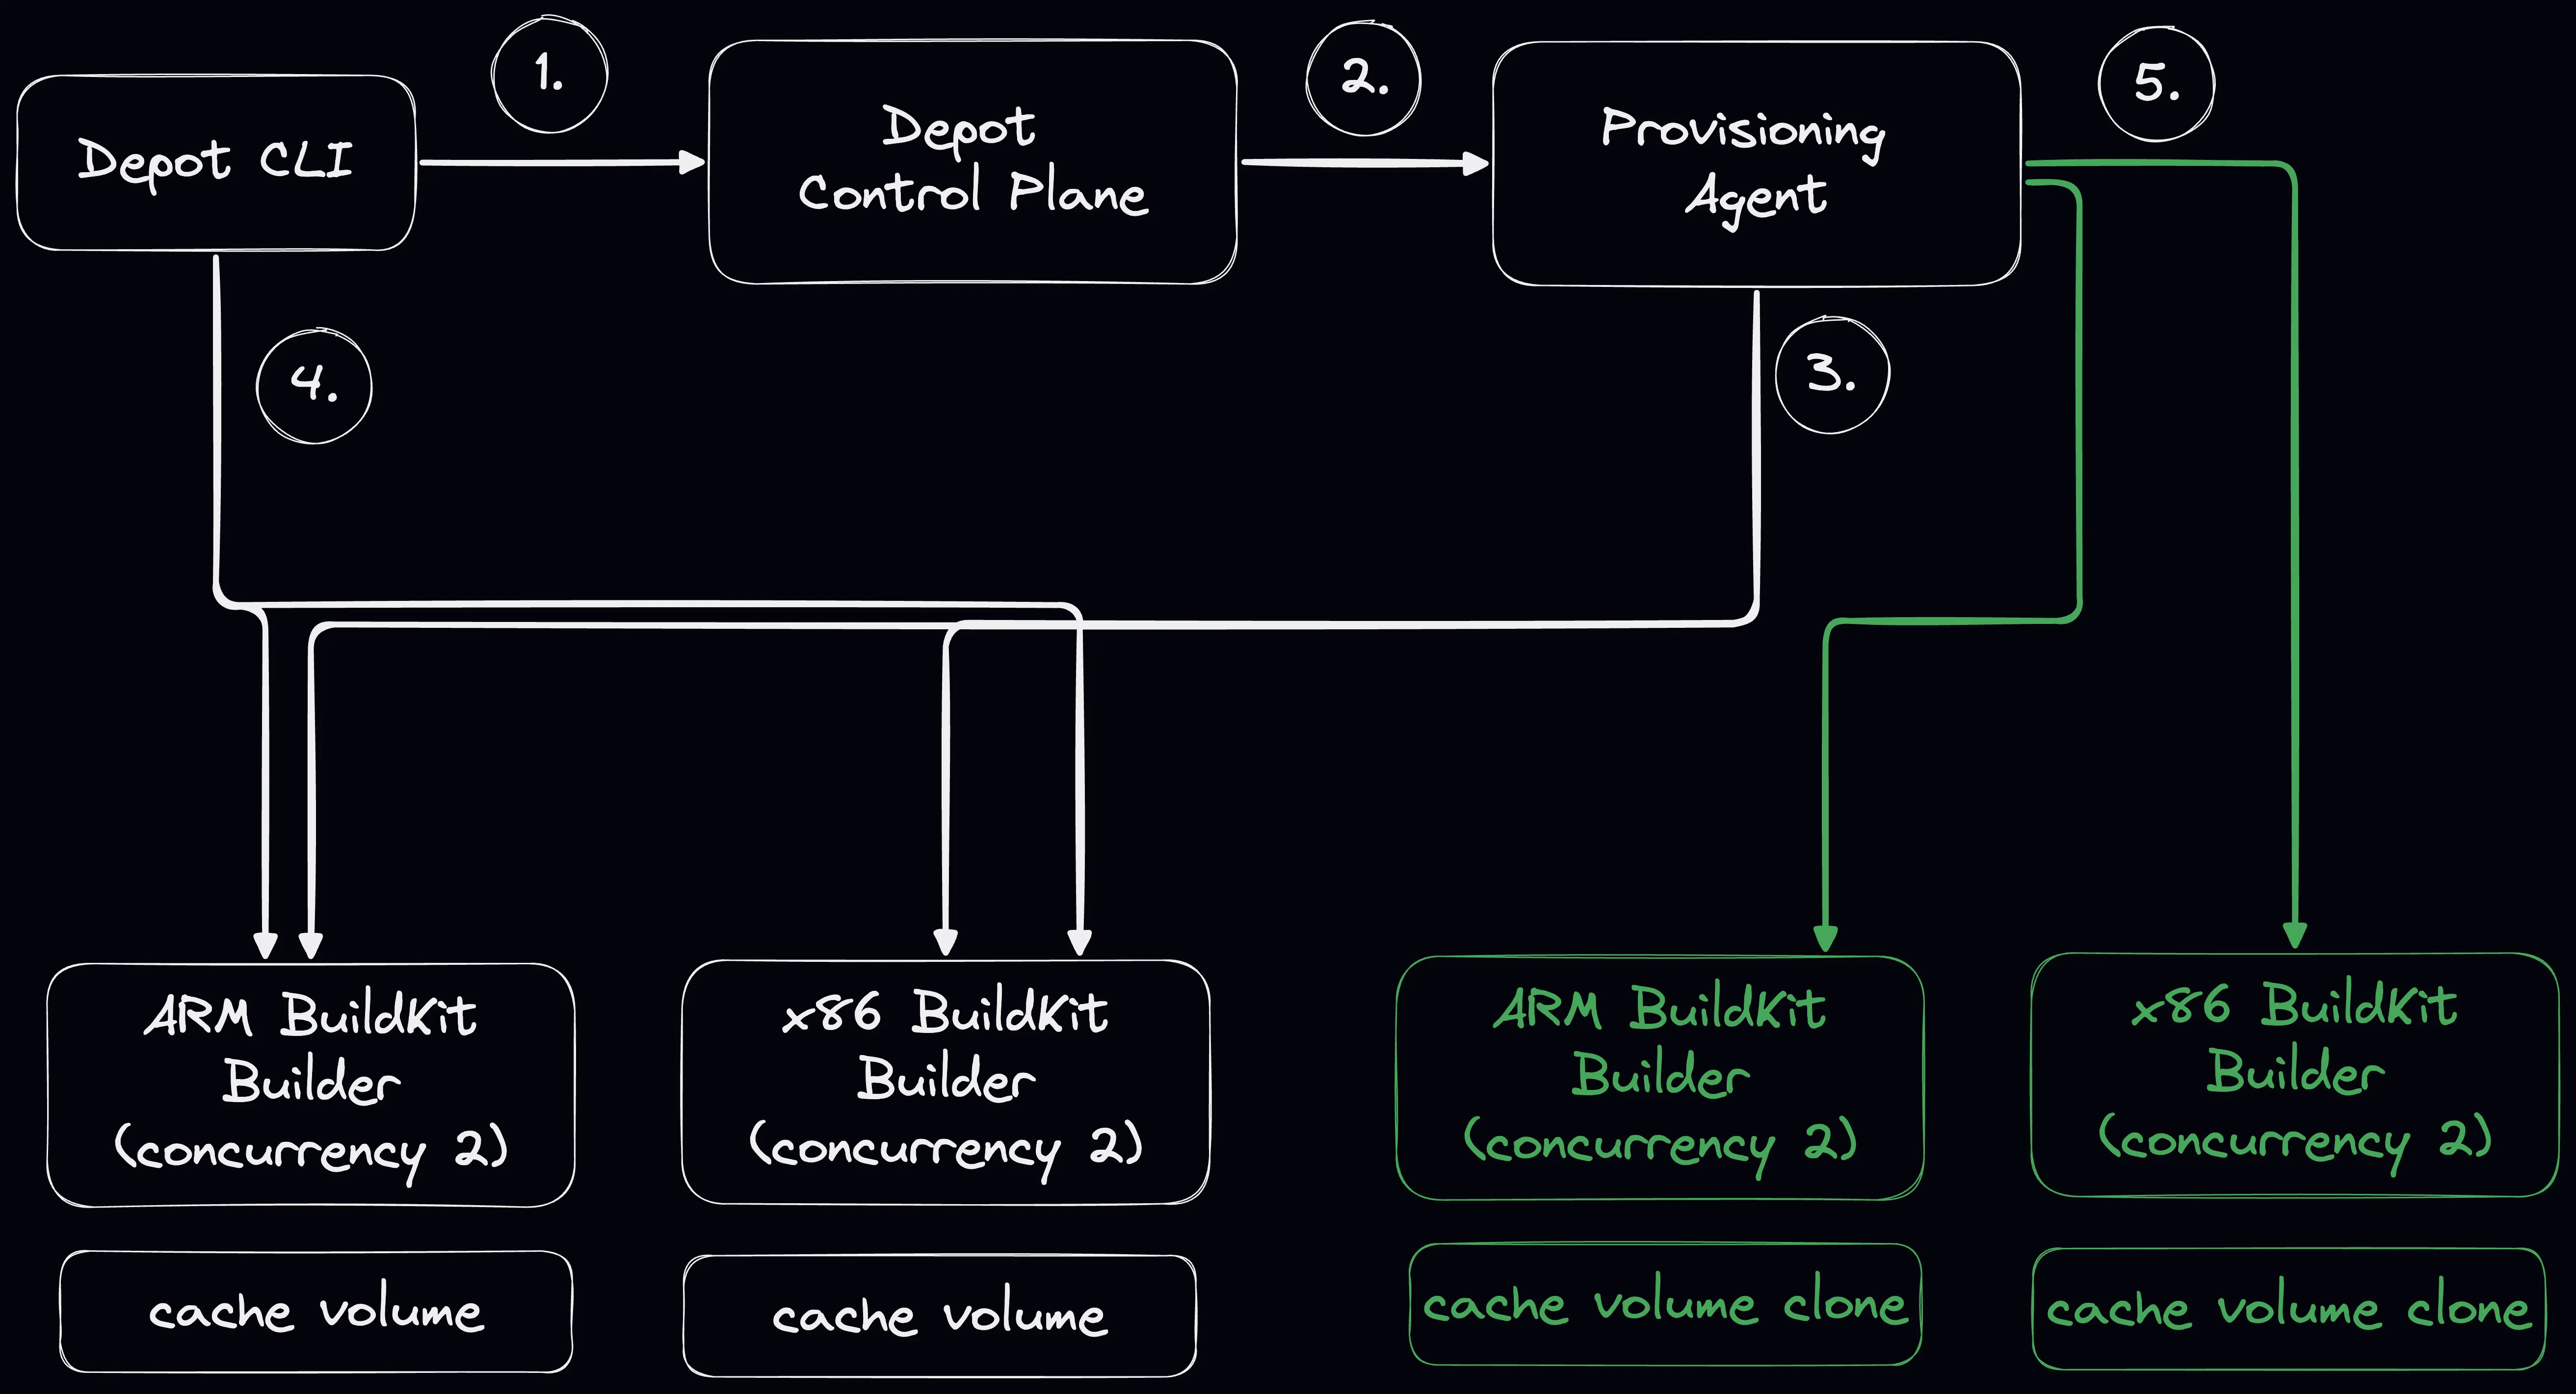
With build autoscaling enabled, Depot will automatically spin up additional BuildKit builders when the concurrent build limit is reached. Here's how the process works:
- You run
depot build, which informs our control plane that you'd like to run a container build - The control plane checks your autoscaling configuration to determine the maximum concurrent builds per builder
- If the current builder is at capacity, the provisioning system spins up additional BuildKit builders
- Each additional builder operates on a clone of the main builder's layer cache
- The
depot buildcommand connects directly to an available builder to run the build
Cache behavior with autoscaling
Additional builders start with a copy of the main builder's layer cache. New layers produced by an additional builder don't get written back to the main builder's cache.
Build configuration tradeoffs
With sustained, resource-intensive concurrency, a single configuration cannot maximize all three of these priorities at once:
- Smaller builders: Keep the amount of compute allocated to each builder low
- Build performance: Keep individual builds fast through available compute, cache reuse, and cross-build deduplication
- Many builds in one project: Keep concurrent workloads together in one cache namespace
The right configuration depends on which two priorities matter most to your workload:
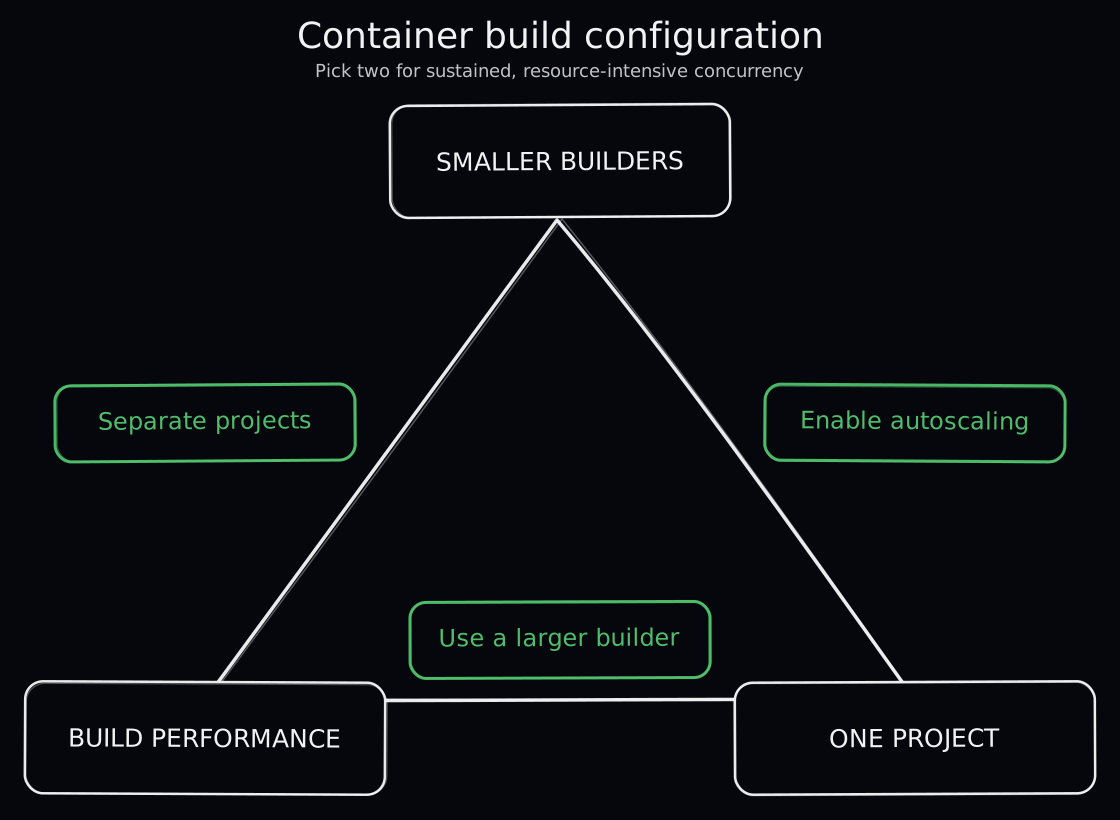
- Smaller builders + build performance: Split independent workloads across projects. Each project gets dedicated builder resources and a persistent, writable cache for its future builds.
- Smaller builders + one project: Enable autoscaling. This favors aggregate throughput and shorter queue times, while accepting less compute per build and less efficient cache reuse across builders.
- Build performance + one project: Use a larger builder. Builds get more compute while staying together to share cache, deduplicate work, and persist new layers, but the builder costs more per minute.
Here, build performance means the latency of an individual build, not aggregate throughput. Autoscaling a small builder can increase total throughput and reduce queue times by distributing concurrent builds across additional builders. However, it does not give an individual build more CPU or memory, and scaled builders cannot write new layers back to the main cache or deduplicate work with other builders. Cache-heavy or resource-intensive builds may therefore be slower than they would be on a larger builder.
This is a rule of thumb for sustained, resource-intensive concurrency rather than a hard limit. You can tune Builds per instance to balance resource isolation and cache efficiency, and you can combine larger builders with autoscaling for workloads that need both vertical and horizontal scaling.
Decide whether to use autoscaling
When autoscaling works well
Build autoscaling is particularly useful in these scenarios:
- High concurrent build volume: When you have many builds running simultaneously that consume all resources of a single builder
- Resource-intensive builds: When individual builds require significant CPU, memory, or I/O resources
- Time-sensitive builds: When you need to reduce build queue times during peak periods
- CI/CD pipelines with parallel jobs: When your pipeline triggers multiple builds at once
When not to use build autoscaling
Consider these tradeoffs before enabling autoscaling:
- Cache efficiency: Additional builders operate on cache clones that are not written back to the main cache, reducing cache hit rates
- Deduplication loss: Builds on different builders cannot share work, even if they have similar layers
- Small, infrequent builds: If your builds are small and run infrequently, the overhead may not be worth it
Recommendation: Before enabling autoscaling, first try sizing up your container builder. You can select larger builder sizes on our pricing page, which allows you to run larger builds on a single builder without needing to scale out.
Enable build autoscaling
To enable container build autoscaling:
- Log in to your Depot dashboard.
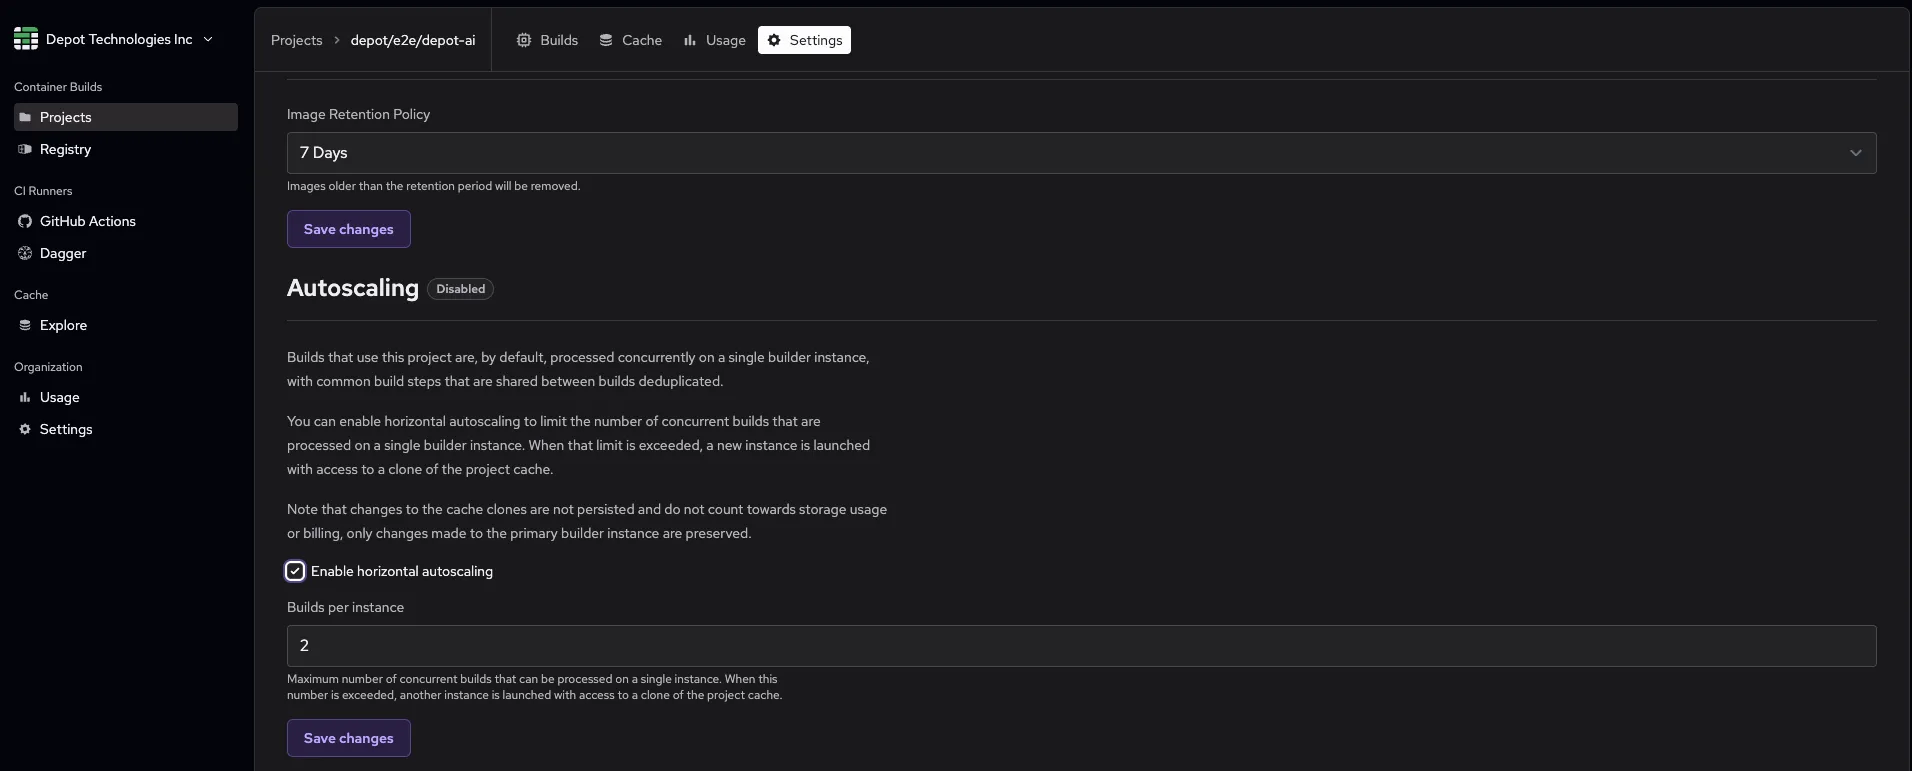
- Click Projects, select a project, and click Settings.
- In the Autoscaling section, toggle on Enable horizontal autoscaling.
- Set Builds per instance (prefilled with
16). - Click Save changes.
Configure builds per instance
Builds per instance determines how many builds can run on a single builder before triggering a scale-out event. For example:
- Setting it to
1means each build gets its own dedicated builder - Setting it to
3means up to 3 builds can share a builder before a new one is launched - Setting it to
16, the prefilled value, means up to 16 builds can share a builder before a new one is launched
Best practices
- Monitor your builds: Use Depot's build insights to understand your build patterns before enabling autoscaling
- Start conservative: Begin with a higher concurrent build limit and decrease if needed
- Size up first: Consider using larger builder sizes before enabling autoscaling
- Review cache hit rates: Monitor if autoscaling significantly impacts your cache efficiency
- Adjust during peak times: You can dynamically adjust settings based on your build patterns
Example: One build per builder
Here's an example of when autoscaling might be beneficial:
Scenario: Your team has resource-intensive builds that compile large applications with heavy dependencies. Each build requires significant CPU and memory resources, and you frequently have multiple builds running concurrently due to:
- Multiple developers pushing code simultaneously
- CI pipelines that build multiple variants of your application (different environments, architectures, or configurations)
- Monorepo setups where changes trigger builds for multiple services
Without autoscaling:
- Multiple resource-intensive builds compete for CPU and memory on a single builder
- Builds experience CPU throttling and memory pressure
- Build times increase dramatically when multiple builds run concurrently
- Builds may fail due to out-of-memory errors when too many run simultaneously
With autoscaling (and Builds per instance set to 1):
- Each resource-intensive build gets its own dedicated builder with full access to 16 CPUs and 32GB RAM
- No resource contention between builds
- Consistent, predictable build times regardless of concurrent load
- Builds can fully utilize available compute resources without interference
Example build characteristics that benefit from this configuration:
- Large Docker images with many layers (>50 layers)
- Compilation of languages like Rust, C++, or Go with extensive dependencies
- Machine learning model training or data processing during build
- Multi-stage builds with resource-intensive compilation steps
- Builds that require significant disk I/O for dependency installation
Result: Each build runs with dedicated resources, preventing resource contention and ensuring optimal performance even during peak usage.
How autoscaling works with depot bake
A depot bake command is submitted as a single build request to BuildKit, regardless of how many targets are defined in the bake file. This means:
- For autoscaling purposes, one
depot bakecommand counts as one build, not multiple builds - For example, if your project has Autoscaling enabled with a value of
2builds per instance, two concurrentdepot bakecommands will run on the same builder, but a third concurrentdepot bakecommand will trigger the provisioning of a new builder - The number of targets inside a bake file doesn't affect the autoscaling count
Splitting bake builds across projects: You can specify different project IDs to split a single bake into multiple builds (one per project). However, the number of targets inside the bake for each project has no impact on autoscaling. Each depot bake command for each project still counts as a single build.
Billing and costs
Build autoscaling is available on all Depot plans at no additional cost.
- No extra charges: Autoscaling itself doesn't incur additional fees
- Standard compute rates: You pay the same per-minute rate for scaled builders as regular builders
- No cache storage charges: Cache clones are temporary and don't count toward your storage quota
- Pay for what you use: Scaled builders are terminated when not in use
Troubleshooting
- Builds still queueing: Verify autoscaling is enabled and check your concurrent build limit
- Increased cache misses: This is expected behavior with cache clones - consider if the speed benefit outweighs cache efficiency
- Costs increasing: Monitor your usage in the Depot dashboard and adjust concurrent limits if needed
For additional help, reach out on Discord or contact support.